
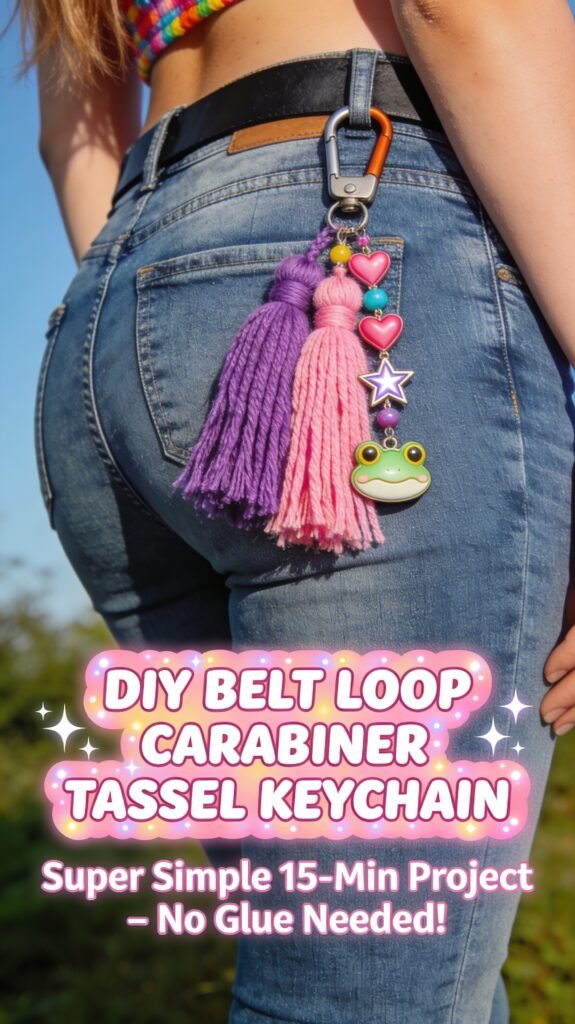
DIY Belt Loop Carabiner Tassel Keychain
As an amazon associate I earn from qualifying purchases.
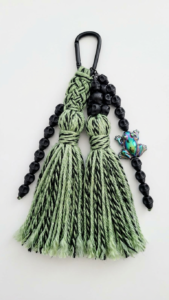
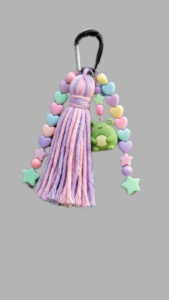
Turn a basic carabiner into a cute, homemade belt loop accessory with this 15-minute tassel project. Perfect for anyone who wants long, dangly flair without the jangle of keys—ideal for Pinterest boards!
Why You’ll Love This
It’s boho but customizable—pastel yarn, heart beads, and a frog charm make it kawaii and personal. Clip it to jeans or a skirt for instant style that sways when they walk.
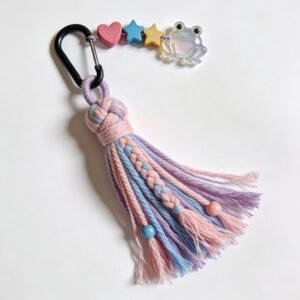
(see the generated image above)
Materials (All from Amazon.com)
| Product | Amazon Search Link |
|---|---|
| Embroidery Floss Set (DMC pastel pink/blue/lavender, 385pk) | View On Amazon |
| Macrame Cord (pastel 3–5mm, 50m+) | View On Amazon |
| Wooden Beads (hearts/stars, pastel 10–12mm, 100pcs) | View On Amazon |
| Acrylic Frog Charms (pack of 5–10) | View On Amazon |
| Small Black Carabiner (1.5–2 inch, 10pk) | View On Amazon |
| Jump Rings (8mm, 100pcs silver/gold) | View On Amazon |
| Mixed Letter Beads (for initials, pastel) optional | View On Amazon |
| Skull Beads (optional) | View On Amazon |
Step-by-Step Instructions
Step 1: Prep the Bundle
Cut 40–50 strands of floss or yarn to 55 cm each using sharp scissors—aim for even lengths but a few slightly longer adds natural boho texture. Gather all strands together and fold the entire bundle exactly in half to create a firm U-shaped loop at the top (this will be your attachment point). Smooth the strands flat with your hand so they lie parallel without tangling.
Step 2: Attach to Carabiner
Open the carabiner gate and push the folded U-loop through from the inside of the gate to the outside (about 5–7 cm of loop should poke through). Reach through the loop and grab the two loose bundle ends, then pull them back through the U-loop firmly but gently. Tug the entire tassel downward evenly to tighten the lark’s head knot securely against the carabiner spine—no gaps or slippage.
Step 3: Add Beads & Knot
Working from the top just below the carabiner, thread your chosen 3–5 beads (hearts, stars, frog charm via jump ring if needed) onto the bundle one by one—they should slide easily if strung parallel. Once positioned 2–3 cm below the carabiner, use all the strands together to tie a tight overhand knot: cross the bundle over itself, wrap one end around, thread back through, and pull both ends hard to cinch. Trim any stray short bits for a clean look.
Step 4: Braid & Fringe
Divide the bundle into 3–4 roughly equal sections (no need to count strands precisely). Loosely braid or twist these sections together for 25 cm downward—keep tension light for a relaxed, organic flow that shows yarn colors. Stop braiding and let the bottom half fall loose naturally, then trim the ends unevenly with scissors (longest in middle, shortest at sides) to create fluffy, boho fringe that moves freely.
Customization Ideas
- Pastel Kawaii: Pink/blue floss + heart beads + frog charm (as shown).
- Neon Grunge: Green/black paracord + skull beads.
- Fandom Twist: Add letter beads spelling a fave character name.
Test the length hanging from a belt loop—it should sway to mid-thigh but not drag.
Why It’s Perfect
No sewing or glue needed. Durable enough for daily wear but soft and safe. Swap colours seasonally or layer multiple tassels on one carabiner for more drama.
As an amazon associate I earn from qualifying purchases.
Related posts:
 14 Pastel Blue Living Room Ideas for Spring
 12 Pastel Green Dining Room Ideas for Spring
 17 Spring Tablescapes With Pastel Colors
 Best Mushroom Decorative Tapestries That Transform Any Room
 10 Best Rattan Pendant Lights That Transform Any Space Beautifully
 How to Style Your Mantel for Easter: 20 Inspiring Decor Looks
 10 Best Bag Charms to Elevate Your Style Game in 2025
 15 Christmas Theme Ideas For Your Living Room